Windows Guide
Complete guide to setup Bitcoin Core, Fulcrum, and Sparrow Wallet on Windows
Scroll down to follow each step
Initial Setup
Create your Bitcoin workspace directory
Create "bitcoinnode" Directory
First, let's create a dedicated folder for all our Bitcoin files.
Open File Explorer and create a new folder named "bitcoinnode" in your Documents folder
Use this folder to save all your downloads in the following steps
Download Binaries
Get the official Bitcoin software and verification files
Download Bitcoin Core
Visit bitcoincore.org and download the bitcoin core executable file
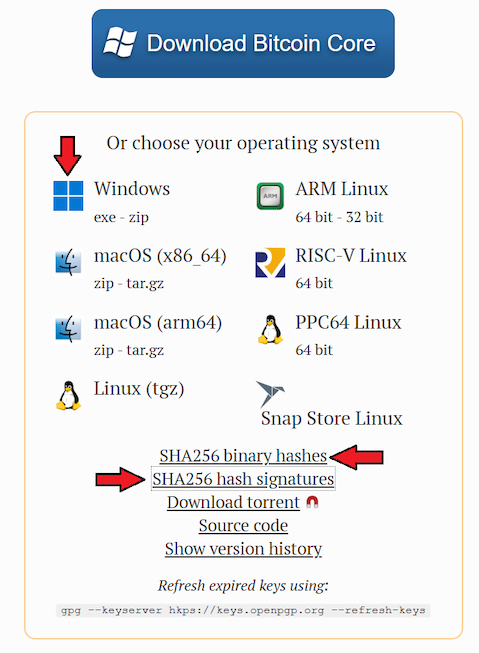
Downloading Bitcoin Core executable file
⚠️ Security Note
Don't open the executable file yet. We'll verify its authenticity first.These verification files are crucial for confirming the software hasn't been tampered with.
Download Bitcoin Core Verification Files
Download the files titled "SHA256SUMS" and "SHA256SUMS.asc"
Verify Downloads
Ensure authenticity using checksums and signatures
Check SHA256 Hash
Open Powershell and navigate to the bitcoinnode directory created in step 1
Execute the following command to compute the SHA256 hash of the downloaded executable file
The file SHA256SUMS contains the sha256 hash of the executable files of this release.Execute the following command to view the SHA256 hashes of the files included in this release
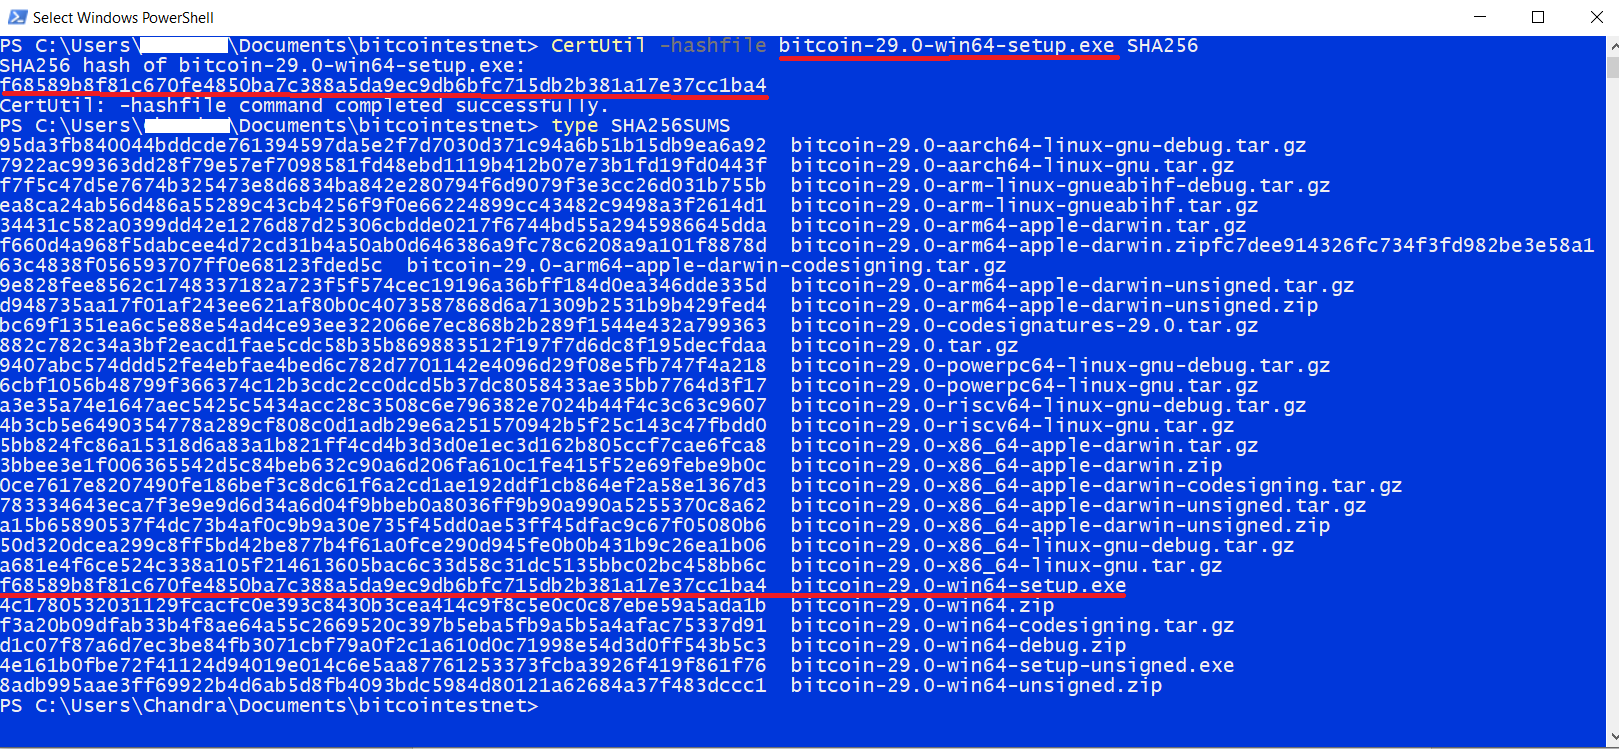
Computing the SHA256 hash of the downloaded executable file and verifying it against the hash provied by the developers
Verify that the computed hash matches the one listed in the SHA256SUMS file. If they match, it confirms the file wasn't corrupted or tampered with during download.
Verify GPG Signature
Visit Bitcoin Core builder keys repository on GitHub and download:
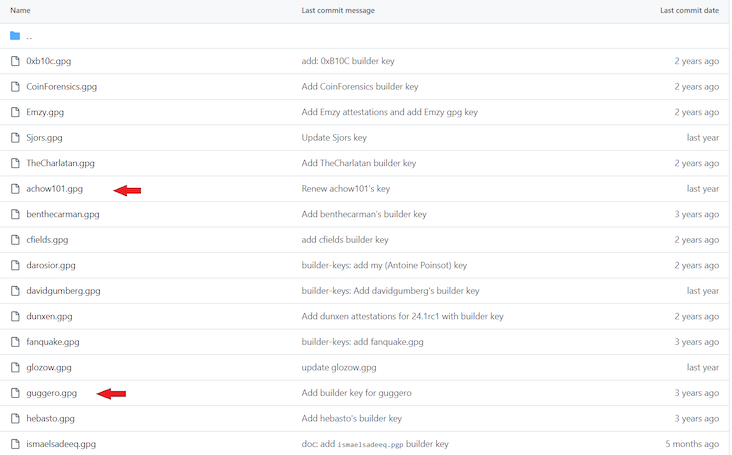
Downloading achow101.gpg and guggero.gpg, public keys of bitcoin core developers
Visit Gpg4Win download and install the latest version of Gpg4Win.
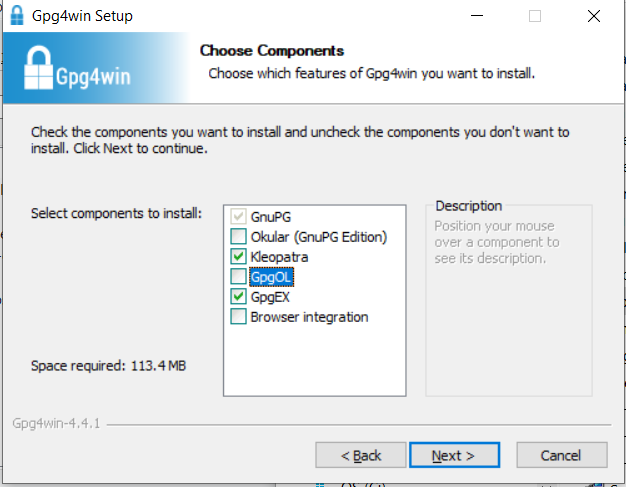
Open the Gpg4Win Kleopatra application and import the downloaded public keys
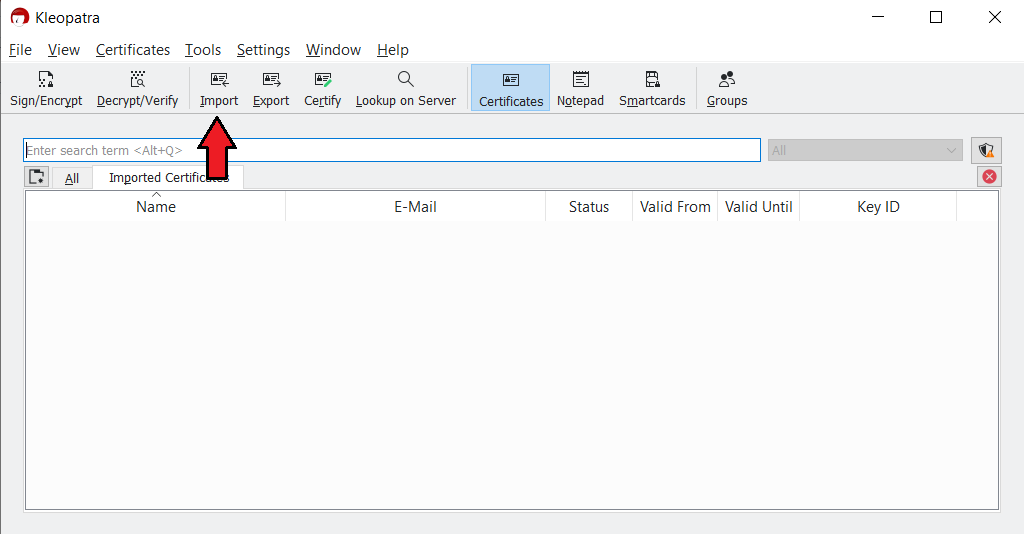
Importing public keys in the Kleopatra application
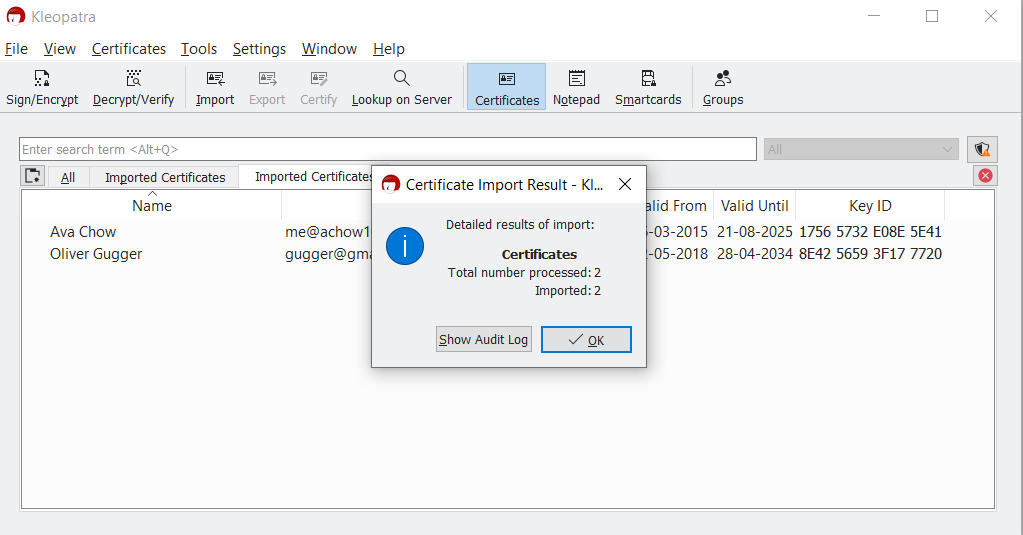
Successfully imported public keys in the Kleopatra application
Verify the SHA256SUMS file downloaed in step 2 using the signature file SHA256SUMS.asc and public key of the Bitcoin Core developers.
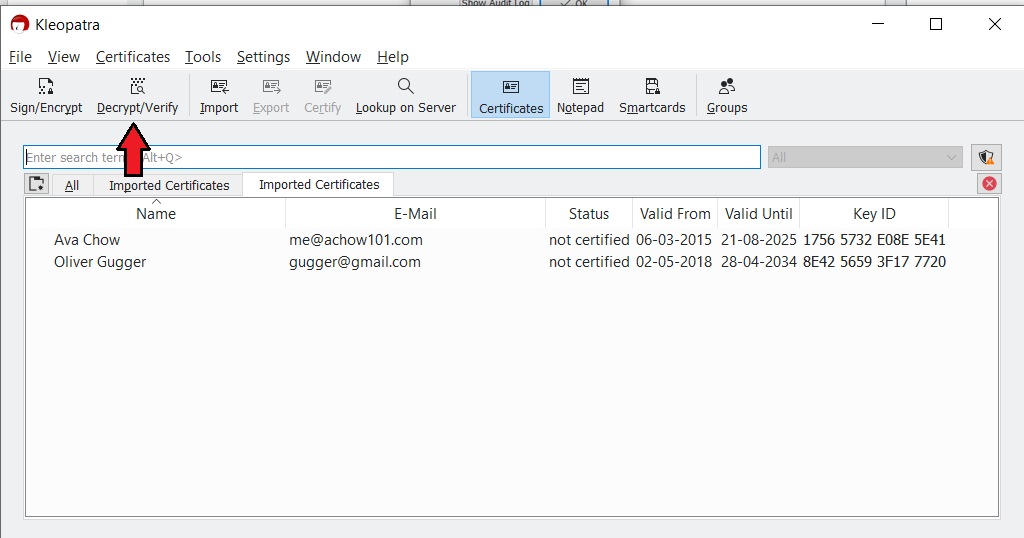
Verifying signatures in the Kleopatra application
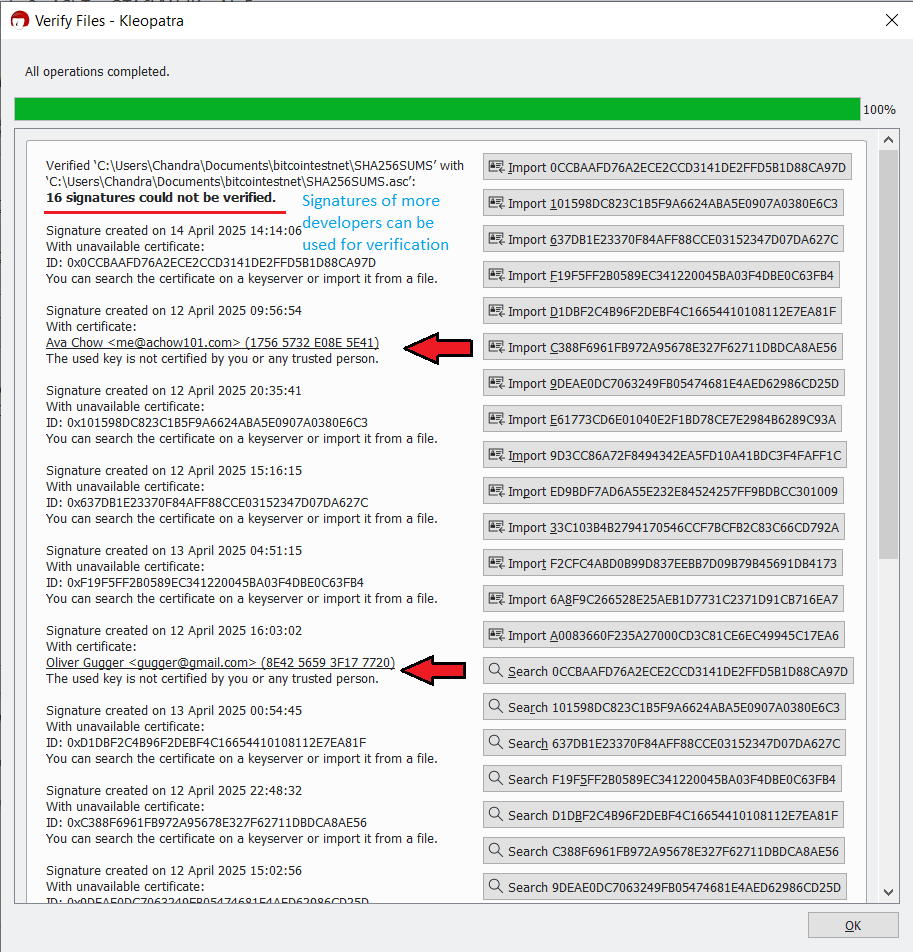
Successfully verified the signature of the SHA256SUMS file
This confirms the SHA256SUMS file containing the SHA256 hash of the Bitcoin Core binary is authentic.
📝 Best Practice Note
It is good practice to import the public keys of multiple Bitcoin Core developers and use it in the verification process.
Install & Configure
Install and configure Bitcoin Core
Install Bitcoin Core
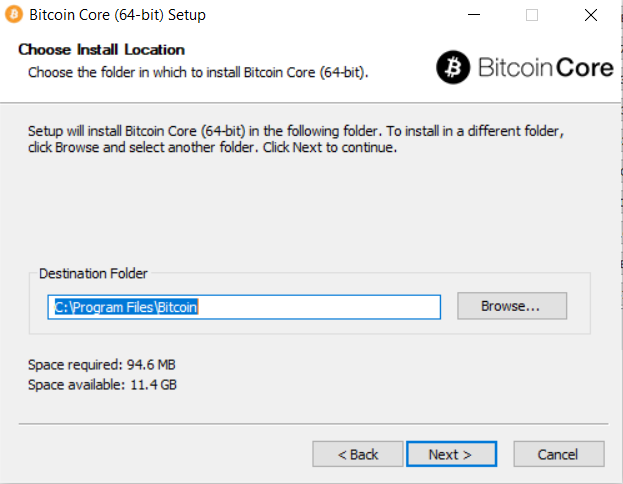
Installing Bitcoin Core using the downloaded executable file after verification
📝 Do not Auto Start
Don't check the box that says "Run Bitcoin Core after installation", If you want to run testnet network. If left checked, Bitcoin Core will start with the mainnet network and start initial block download (IBD) on the mainnet.
Create Configuration File
Navigate to
C:\Users\<YourUsername>\AppData\Roaming\Bitcoin and create
bitcoin.conf
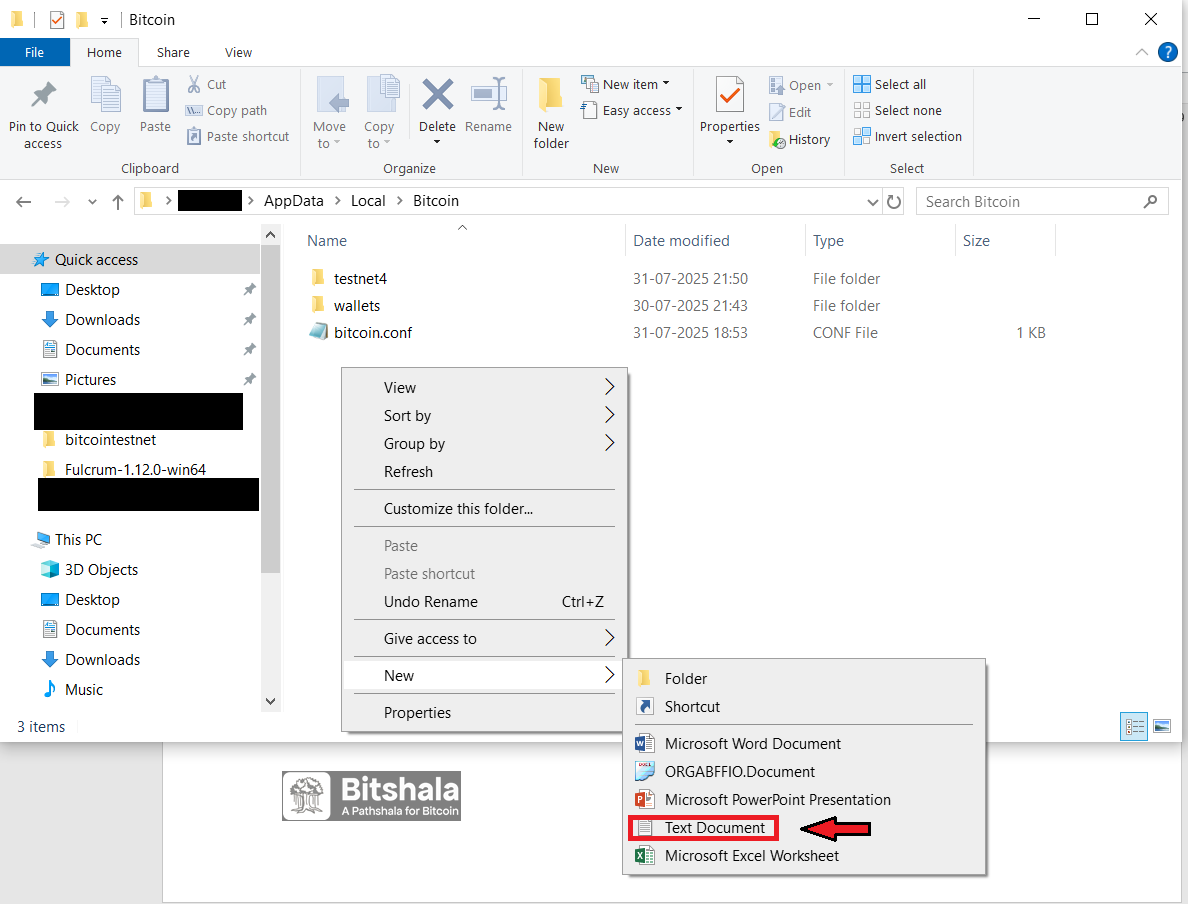
Creating the bitcoin.conf file in the default Bitcoin directory
Copy the following configurations into the bitcoin.conf file
testnet4=1
# Enable Server mode
server = 1
# Set RPC Credentials
rpcuser=bitcoin
rpcpassword=bitcoin123
# Enable full transaction index
txindex=1
# Enable ZMQ notification
zmqpubrawblock=tcp://127.0.0.1:28334
zmqpubrawtx=tcp://127.0.0.1:28335
zmqpubhashblock=tcp://127.0.0.1:28336
[testnet4]
rpcbind=127.0.0.1
rpcallowip=127.0.0.1
rpcport=18332
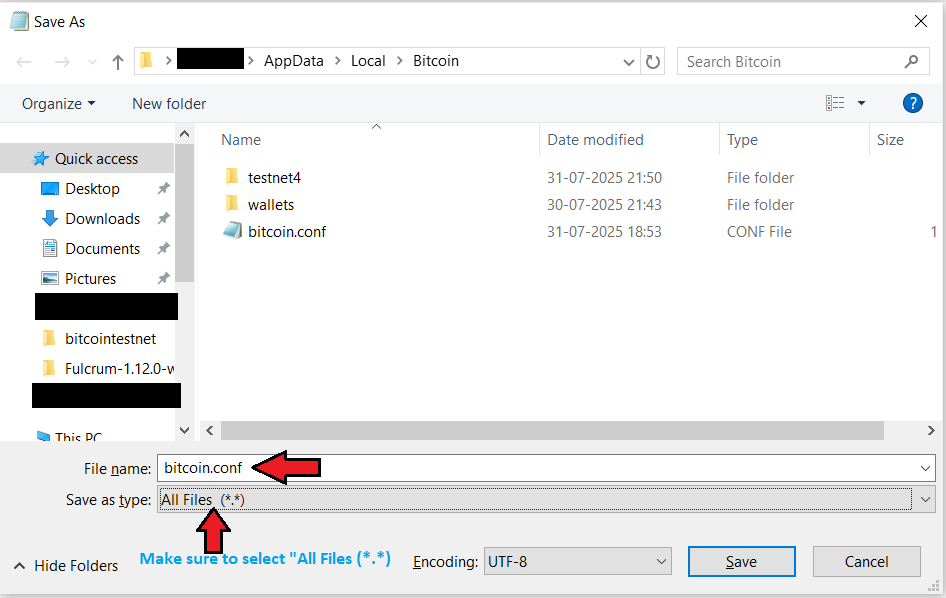
Saving the bitcoin.conf file in the default Bitcoin directory
📝 Configuration Note
This configuration runs Bitcoin Core on testnet4 - an
alternative Bitcoin blockchain specifically for testing and
development. For mainnet remove 'testnet4=1' and
[testnet4] in the above configuration.
Blockchain Sync
Launch and sync your Bitcoin node
Start Bitcoin Core
From your start menu open Bitcoin Core(testnet4)
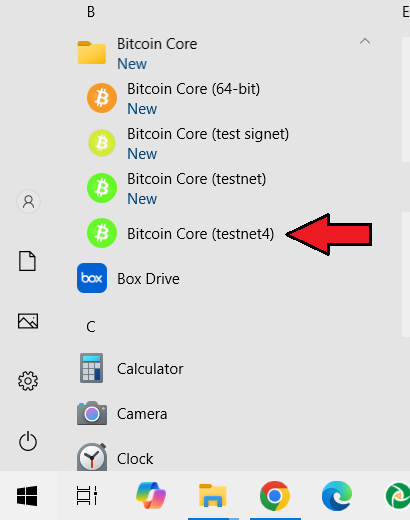
Starting the Bitcoin Core (testnet4) application
Your node needs to sync with the testnet4 network. This process
can take some time. If a pre-synced testnet4 folder is provided by
your instructor, replace the existing testnet4 directory
C:\Users\<YourUsername>\AppData\Roaming\Bitcoin\testnet4 for
faster setup. It is always best to verify the blocks yourself, by letting Bitcoin Core perform the initial block download (IBD).
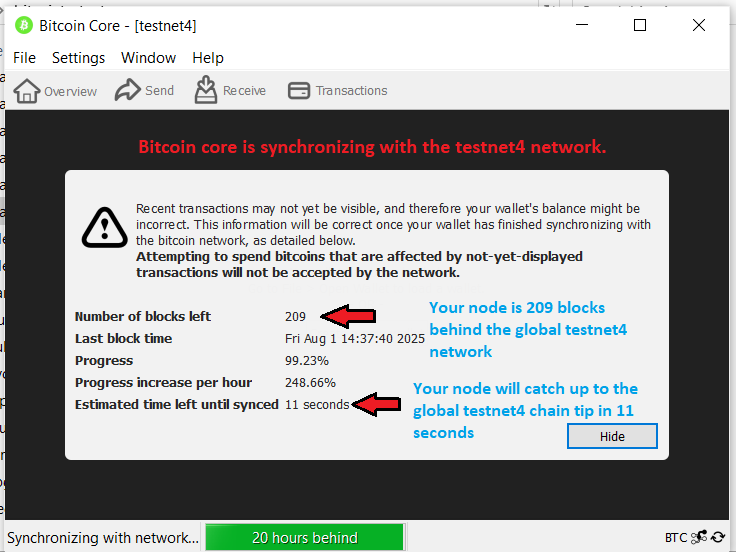
Bitcoin Core is downloading and verifying all testnet4 blocks. This creates a complete copy of the testnet blockchain on your machine.
Install Fulcrum
Download, Verify & Install your personal electrum server
Download and Verify Fulcrum
Visit Fulcrum's repository and download the following files
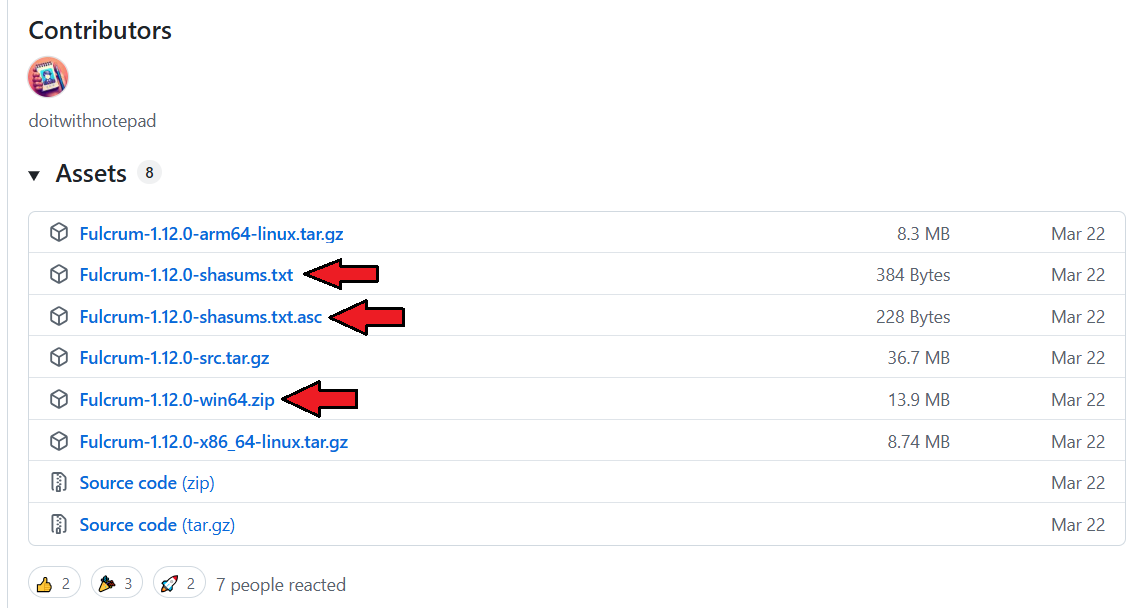
Files to be downloaded from Fulcrum's repository
Download Fulcrum developer public keys and verify as in step 3
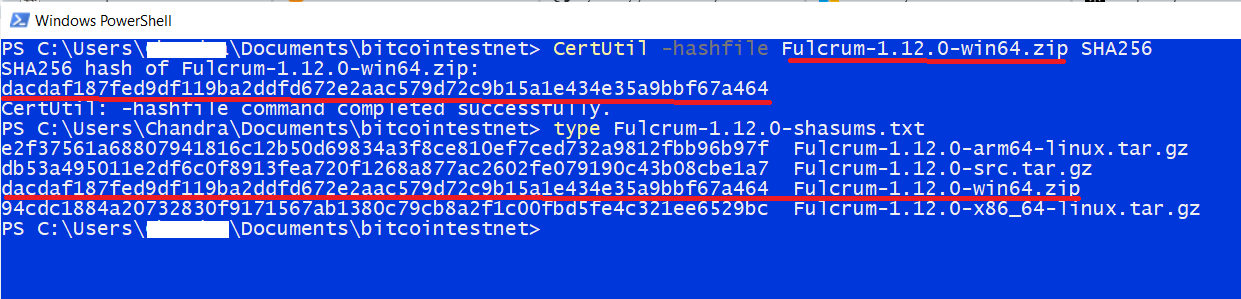
Verifying Fulcrum
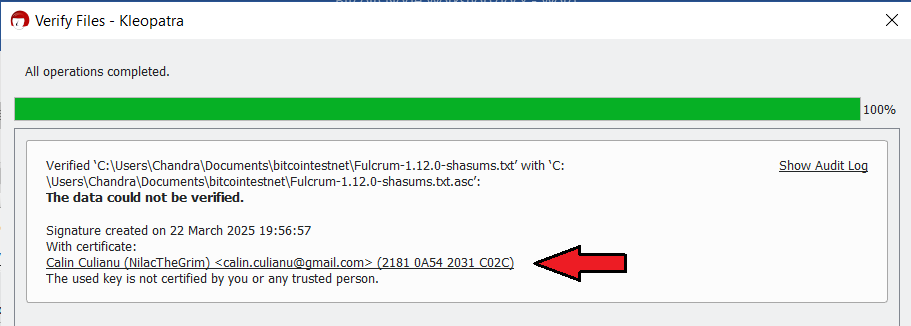
Verifying Fulcrum Signatures
Install Fulcrum
Unzip the Fulcrum-1.12.0-win64.zip file
Configure Fulcrum
Set up Fulcrum to connect with Bitcoin Core
Create Fulcrum Configuration
Inside the Fulcrum directory, create a configuration file:
fulcrum.conf
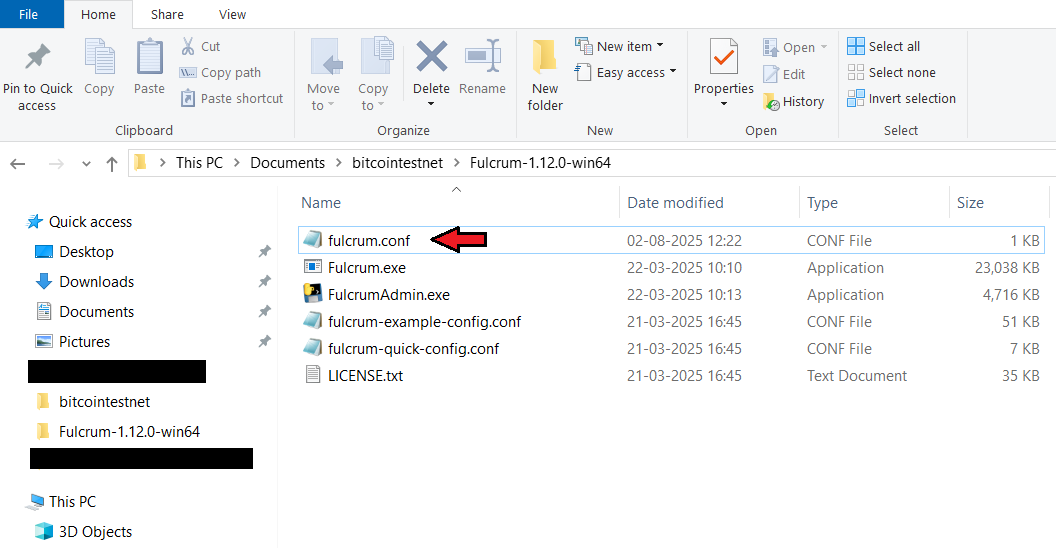
Creating configuration file for Fulcrum
testnet4=1
# Set data directory
datadir = C:\Users\<YourUsername>\AppData\Roaming\Fulcrum\data
# BTC Core Credentials
bitcoind = 127.0.0.1:18332
rpcuser = bitcoin
rpcpassword = bitcoin123
rpcbind=127.0.0.1
rpcallowip=127.0.0.1
Launch Fulcrum
With Bitcoin Core running, launch Fulcrum using the following command form within the newly created Fulcrum directory
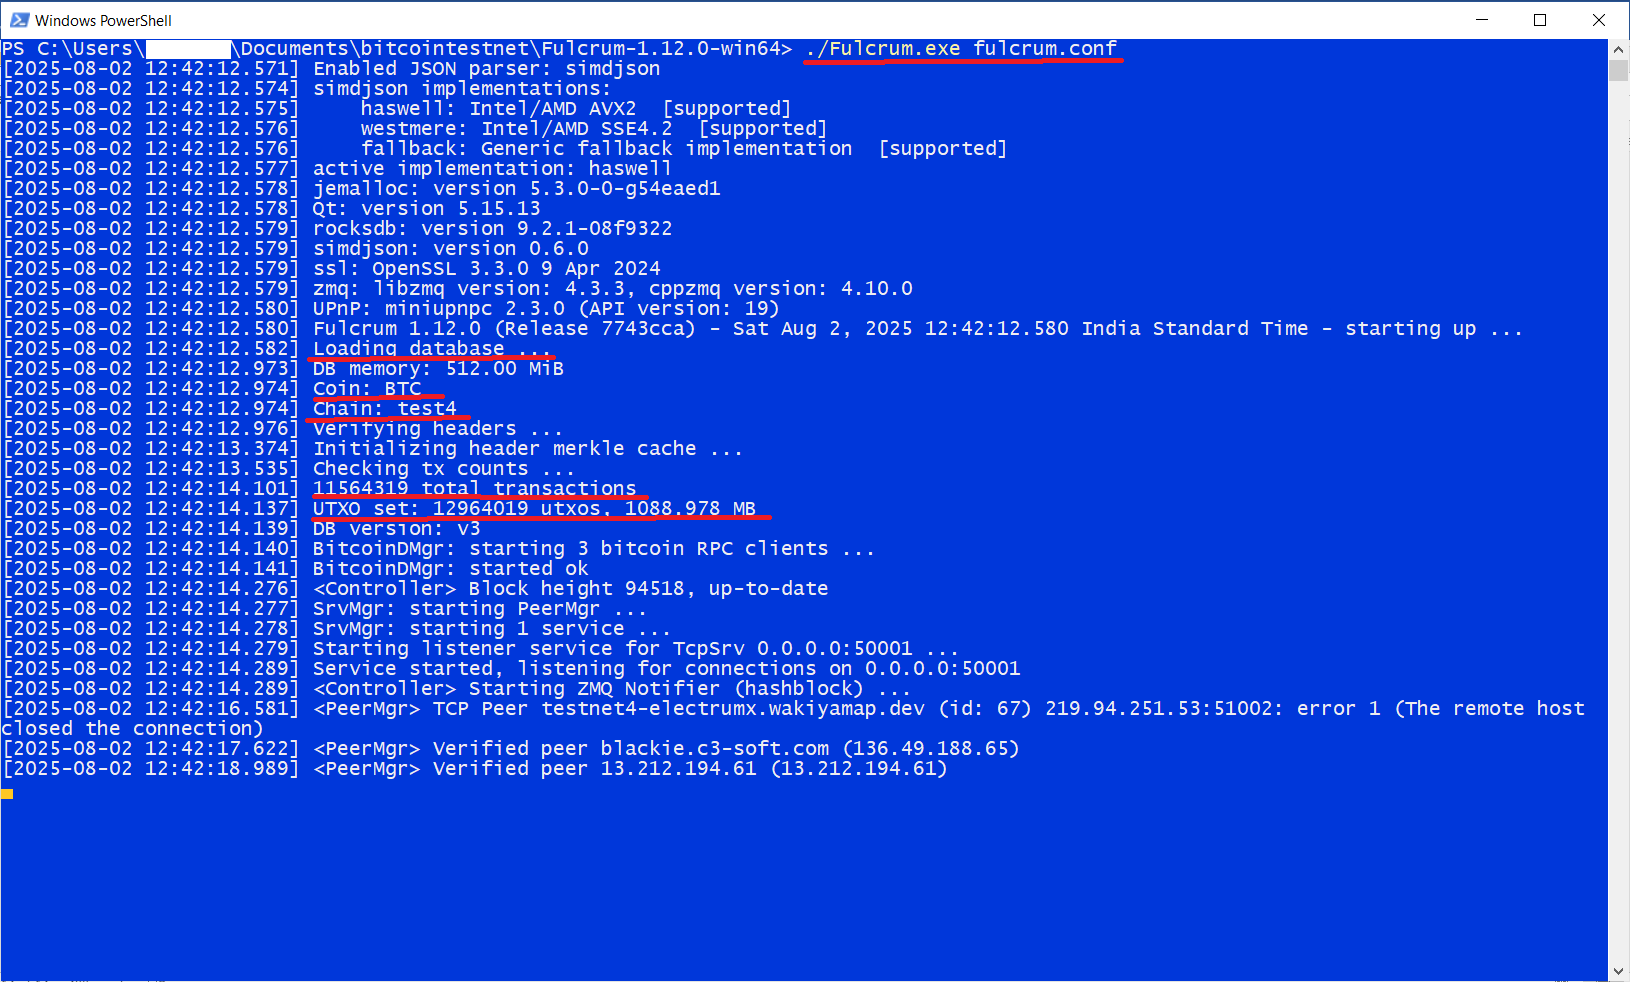
Starting Fulcrum server
⚠️ Important
Keep this powershell window open and running in the background. Fulcrum needs to index all transactions, which may take time.
Install Wallet
Get your Bitcoin wallet interface
Download Sparrow Wallet
Visit https://sparrowwallet.com/download/ and download the latest Sparrow Wallet installer for Windows.
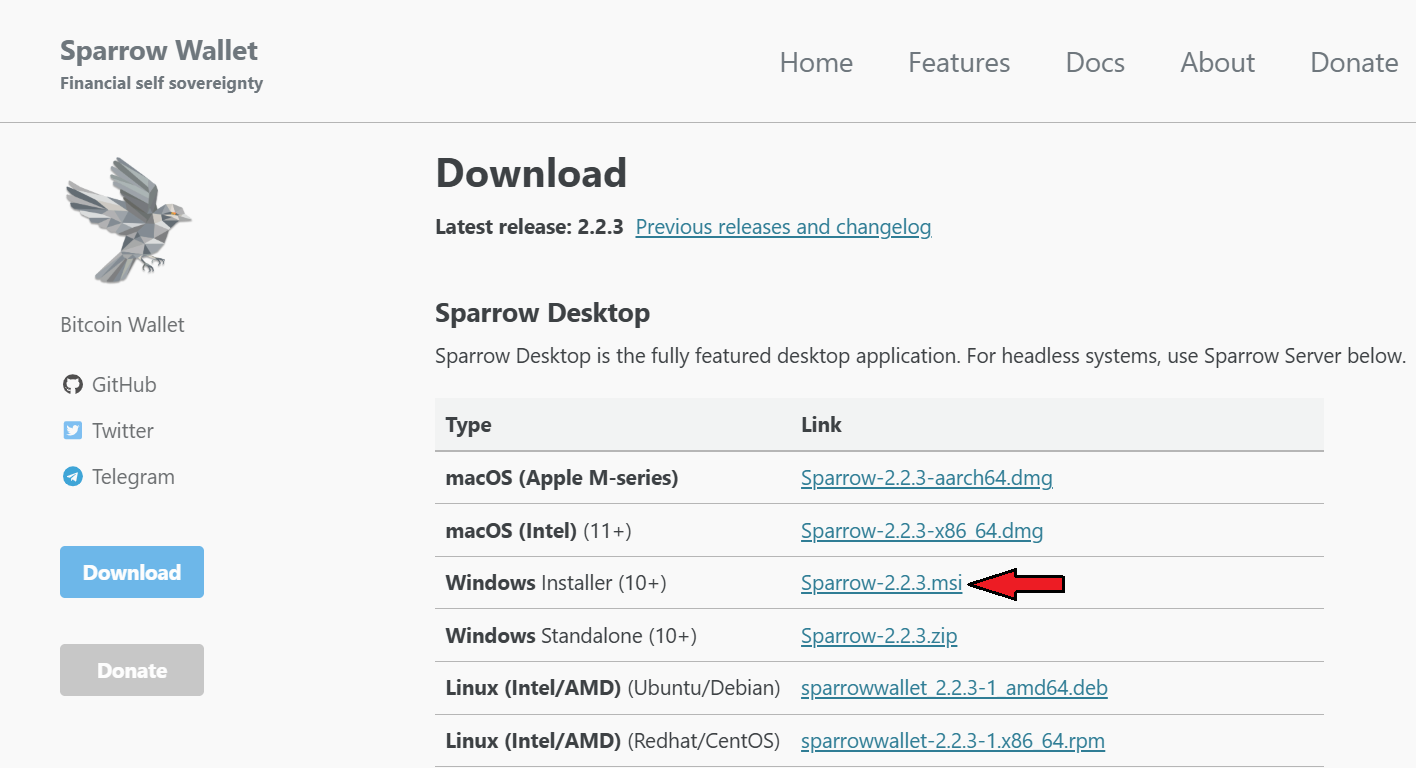
Downlaoding Sparrow Verification Files
Verify Sparrow Wallet
Use Sparrow's built-in verification tool
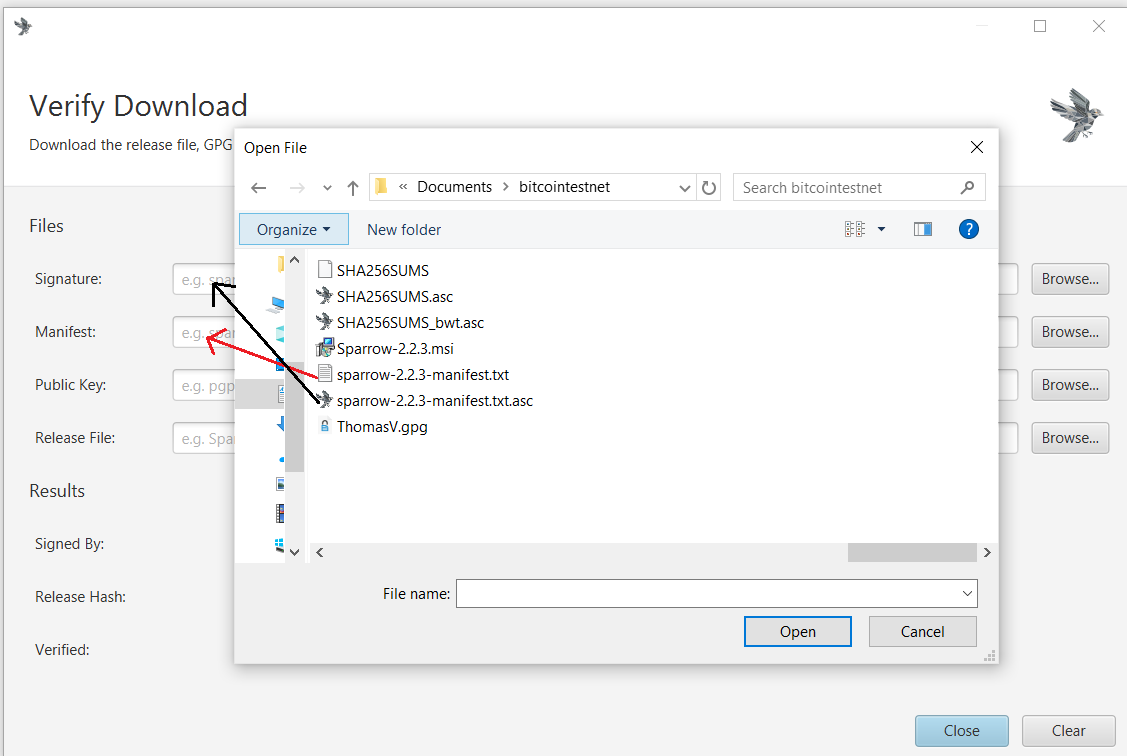
Uploading the signature, manifest, and installer files for the in-built verifier to perform verification
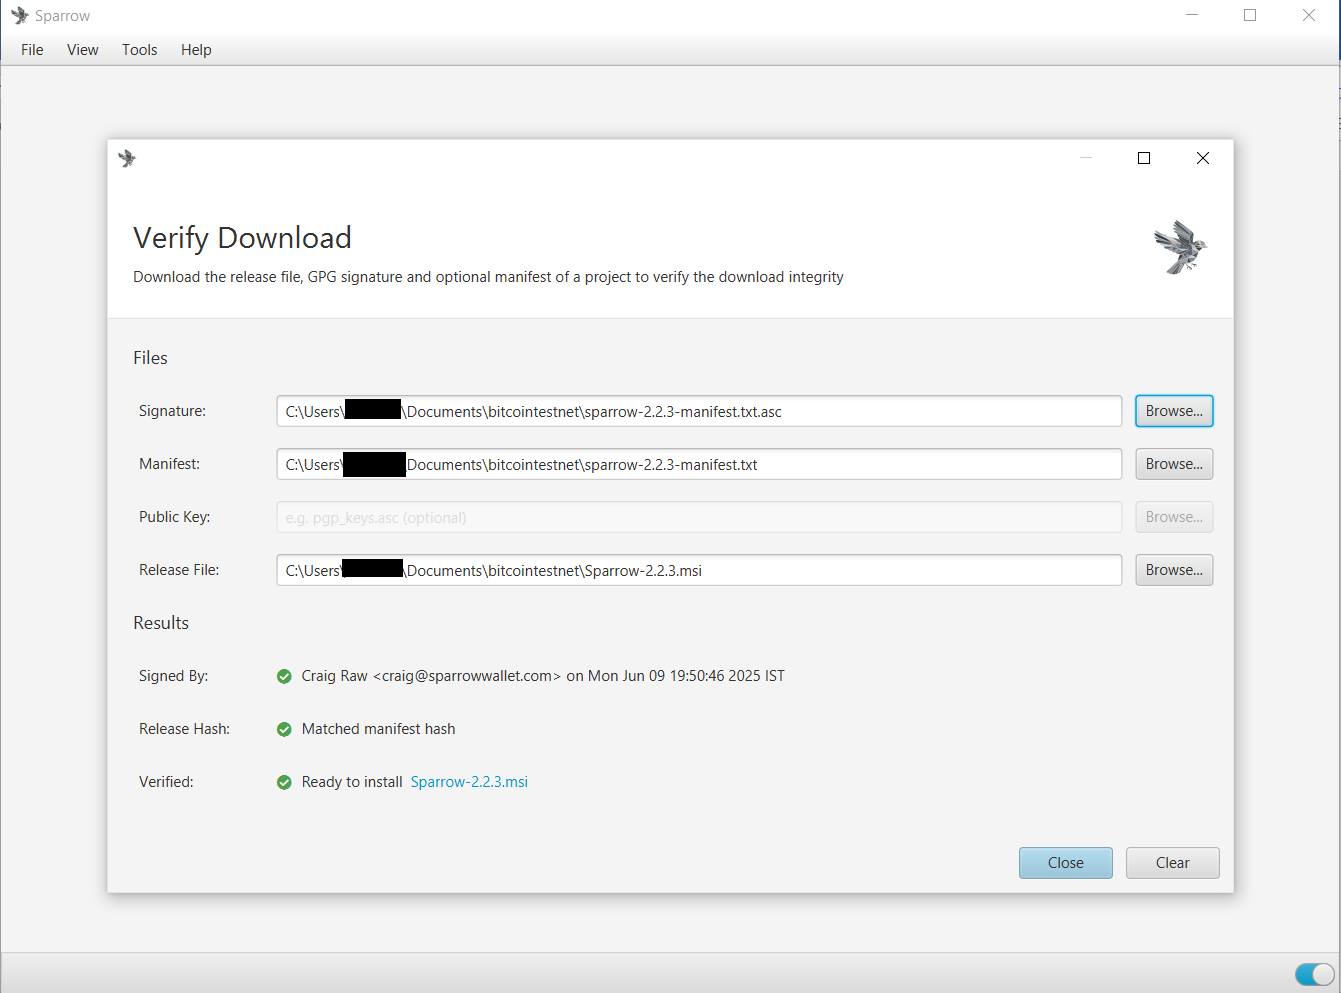
Successful Verification of Sparrow Wallet
Connect Wallet
Link Sparrow Wallet to your Fulcrum server
Configure Sparrow Connection
Restart Sparrow Wallet in testnet4
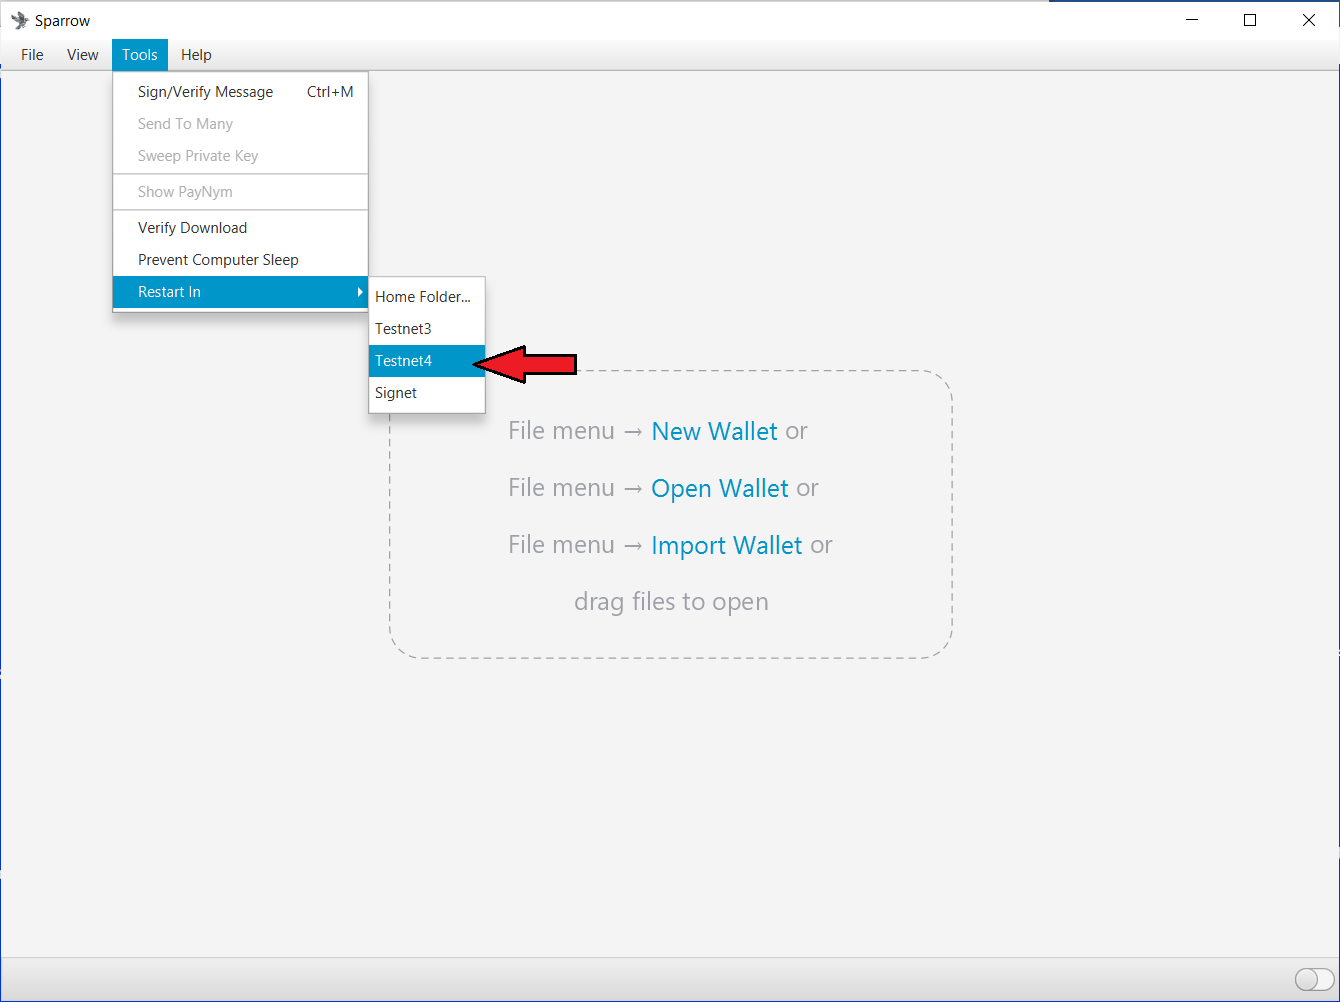
Switching Sparrow Wallet to testnet4
Open Sparrow Wallet settings and enter the following configurations in the Private Electrum tab
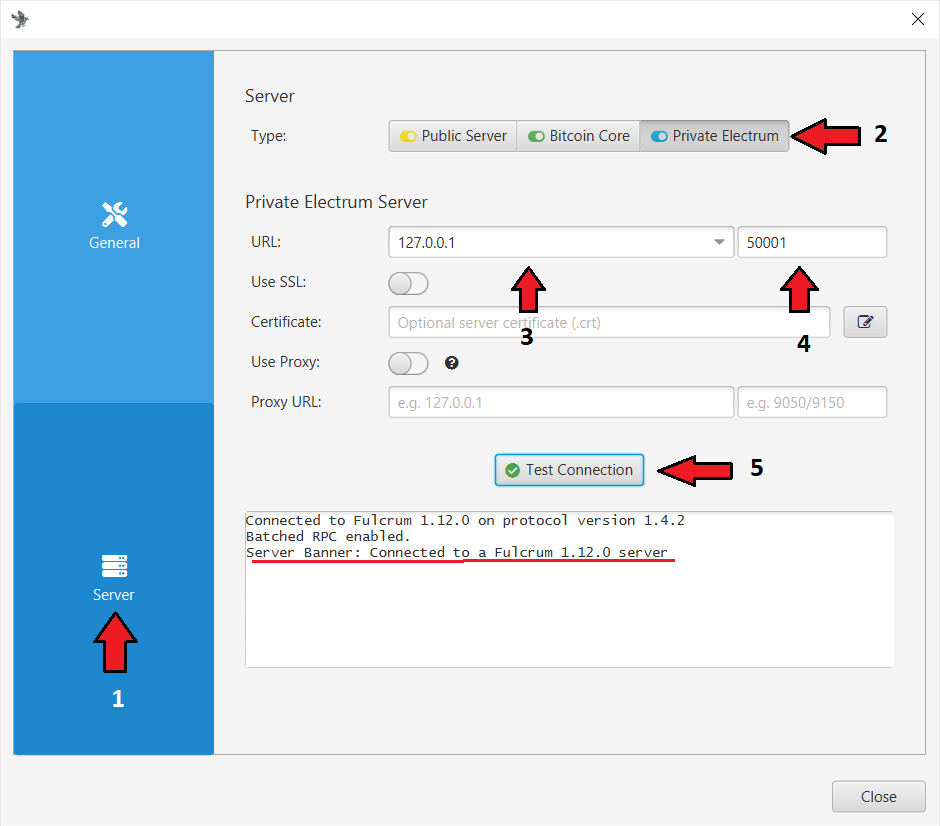
URL: 127.0.0.1
PORT: 50001
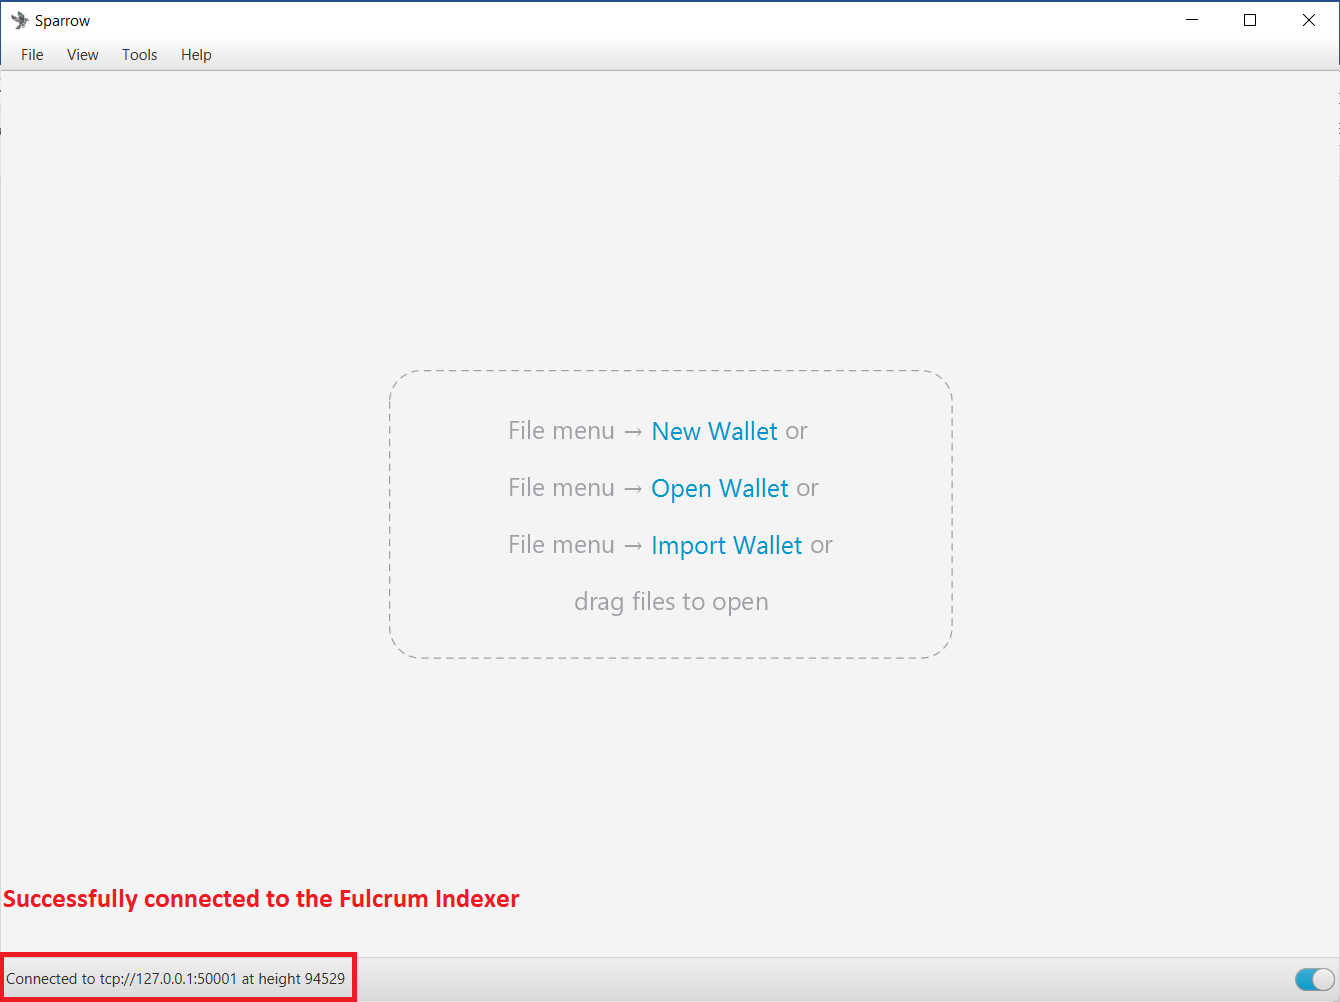
Sparrow Wallet connected to Fulcrum
Create Wallet
Set up a new testnet4 wallet
Generate New Wallet
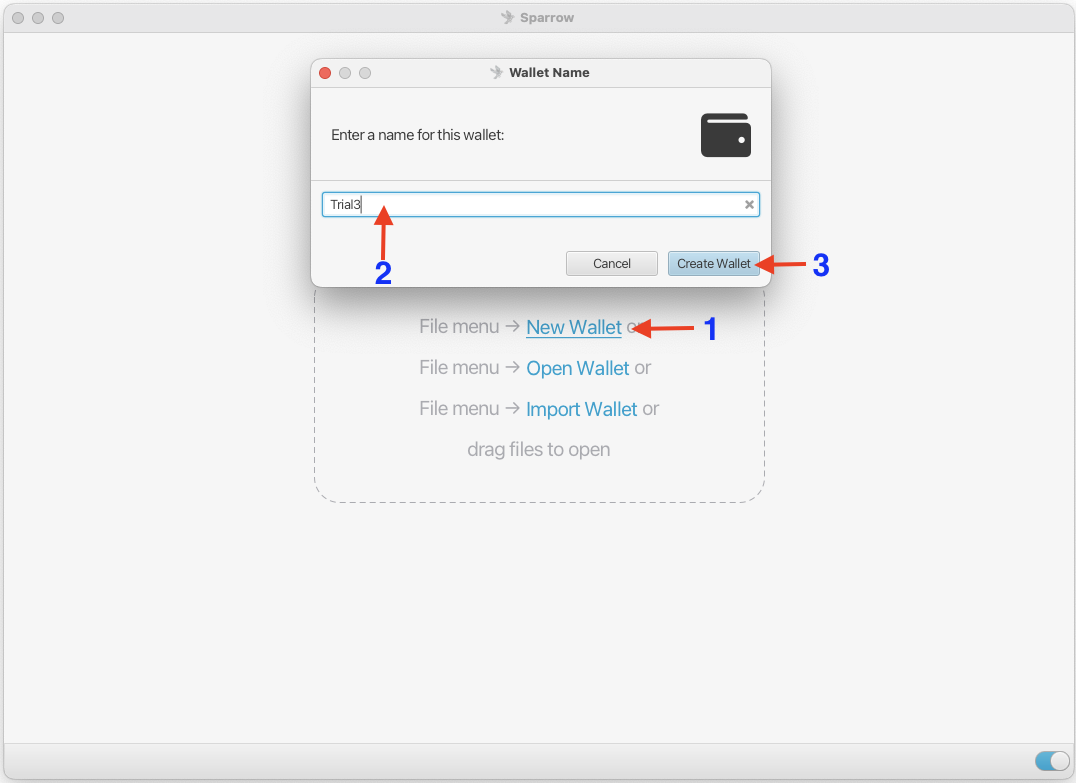
Naming a new wallet
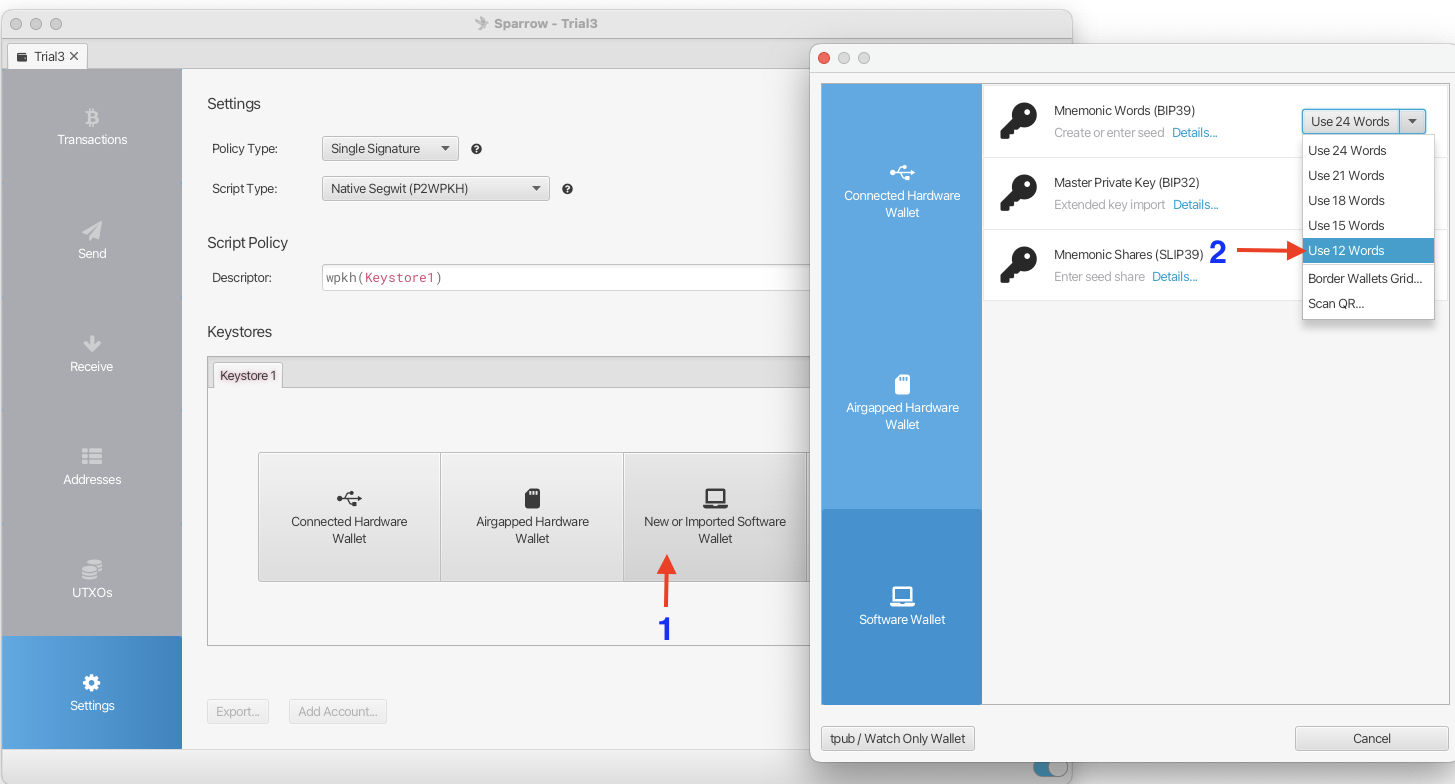
Creating a software wallet with 12 mnemonic words
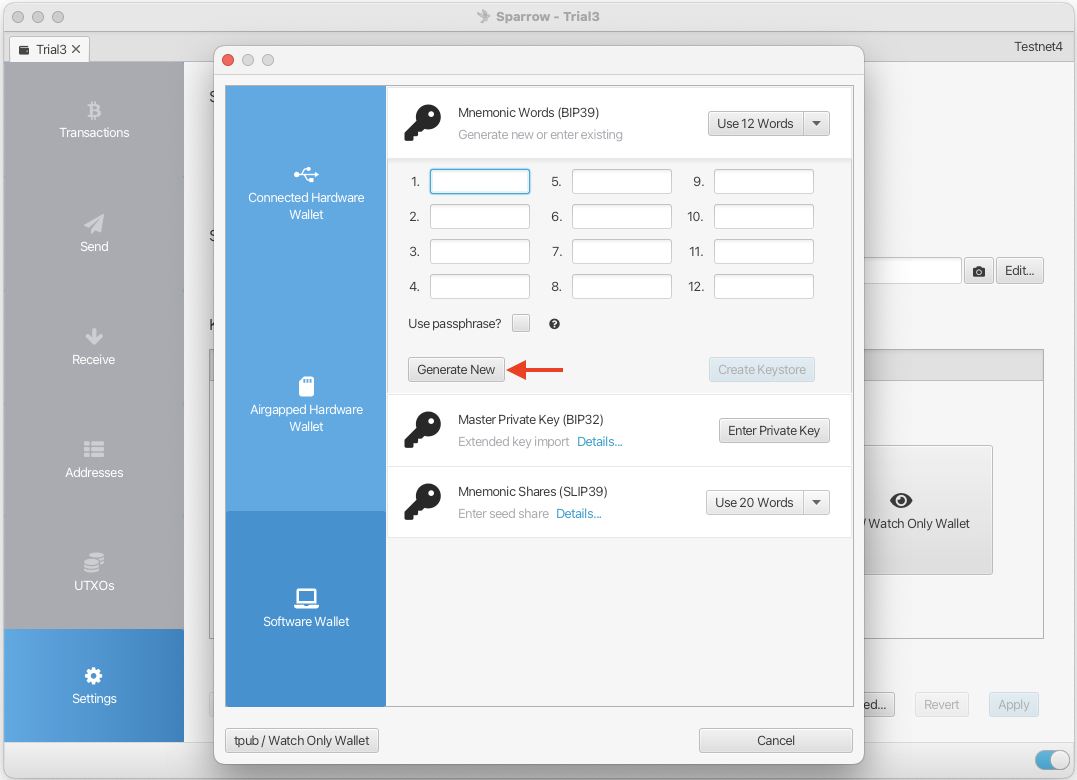
Generating 12seed mnemonic words
🔒 Security Warning
Never input mnemonic words into any other device unless you are absolutely certain about what you are doing. Write down your mnemonic words in the exact order they appear. For maximum security, consider stamping them onto steel plates for long-term safekeeping. For long-term safekeeping, of mainnet bitcoins, use of Hardwate Wallet is strongly recommended.
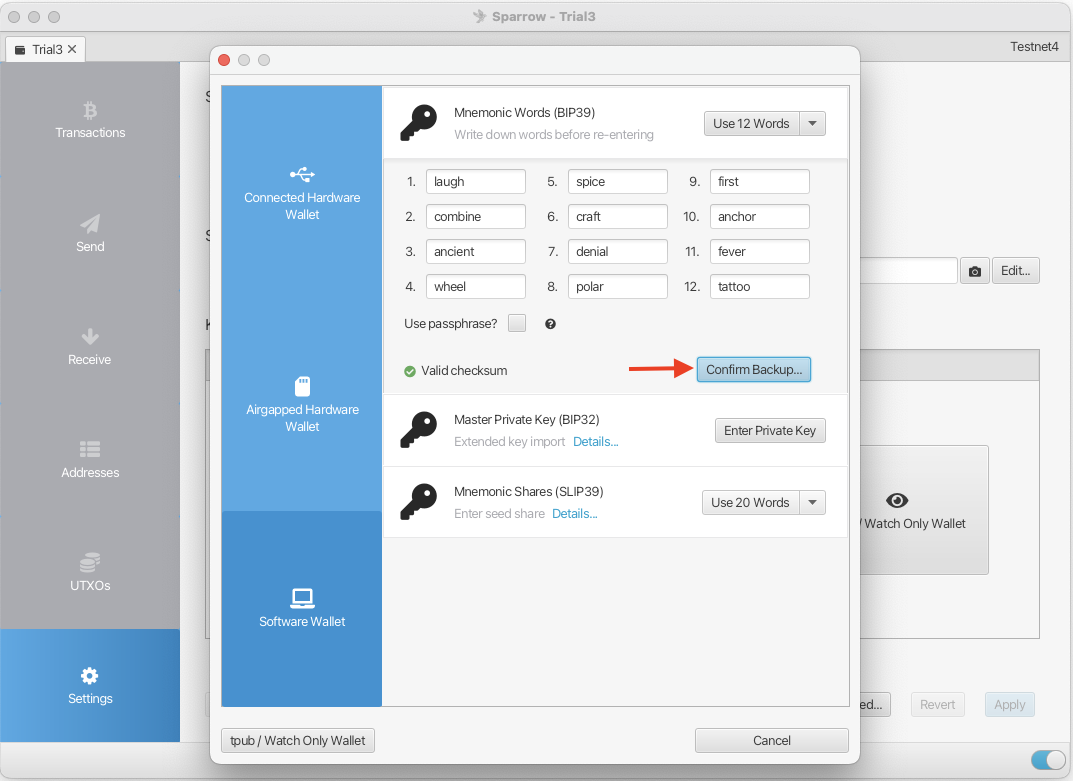
To make sure that you have written down the words correctly, Sparrow asks you to reenter them.
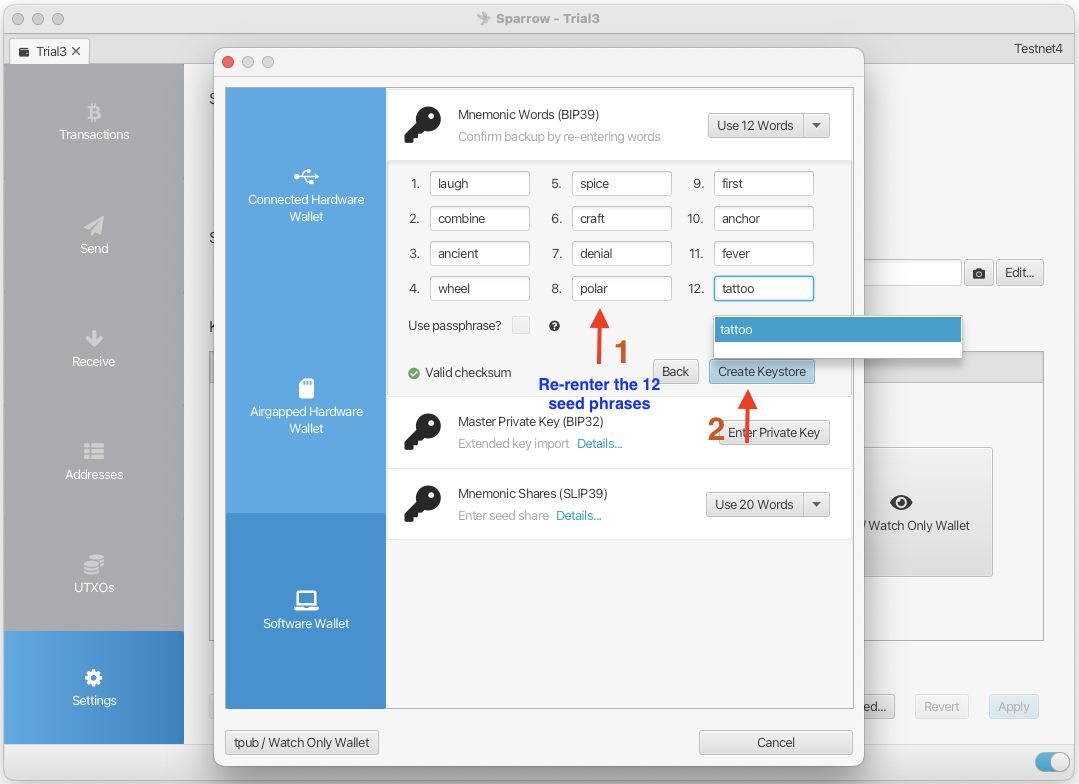
Creating a keystore
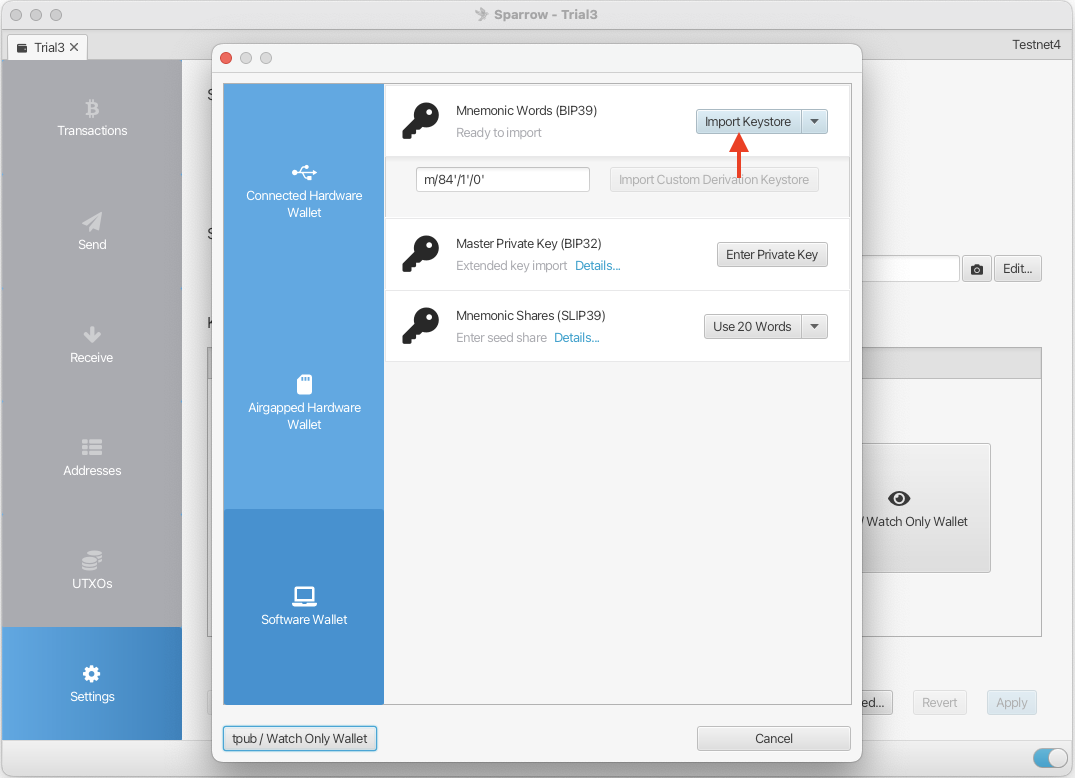
Once created, the keystore is imported into your wallet.
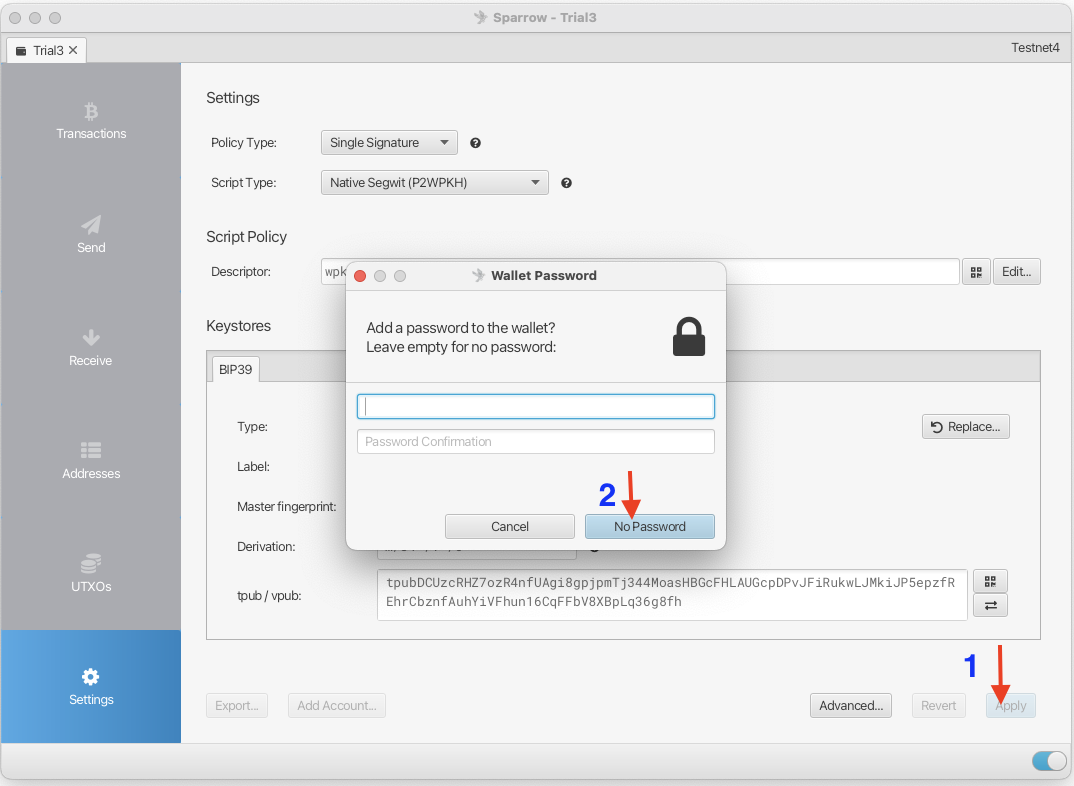
Applying the settings to the wallet
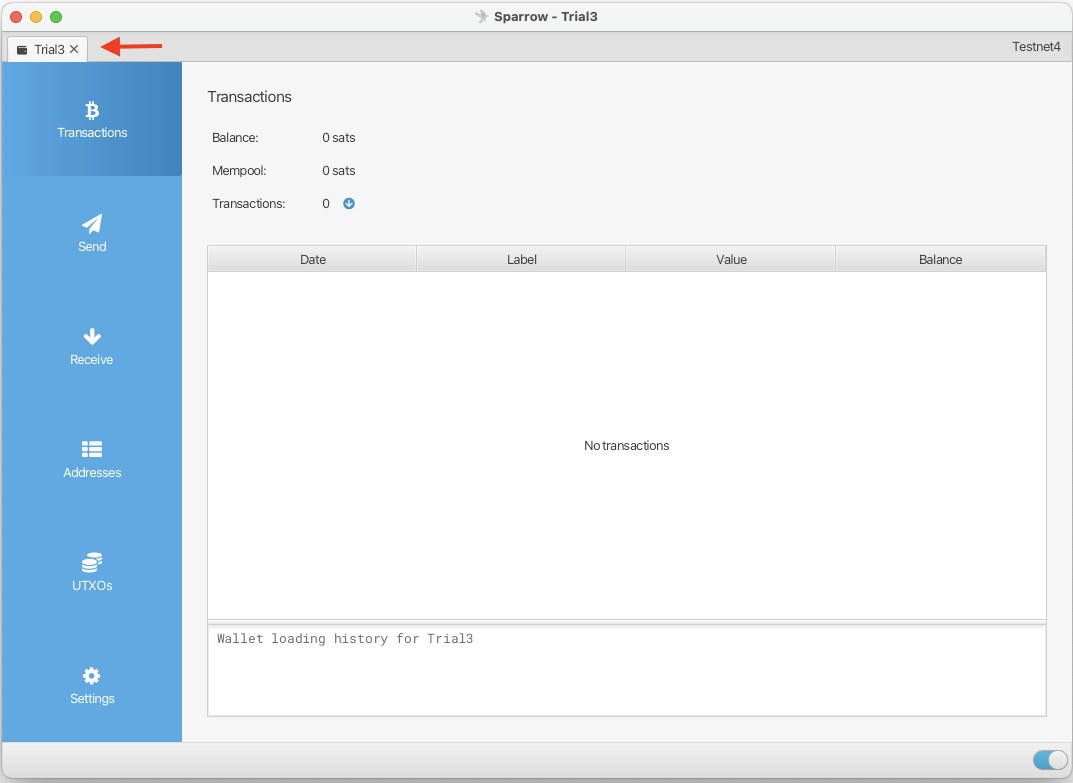
Your Sparrow wallet is now ready to use. Get some testnet4 coins from a faucet and start experimenting!
🎉 Congratulations!
Your complete Bitcoin sovereignty stack is now ready! You have Bitcoin Core running, Fulcrum indexing transactions, and Sparrow Wallet connected to your personal infrastructure.